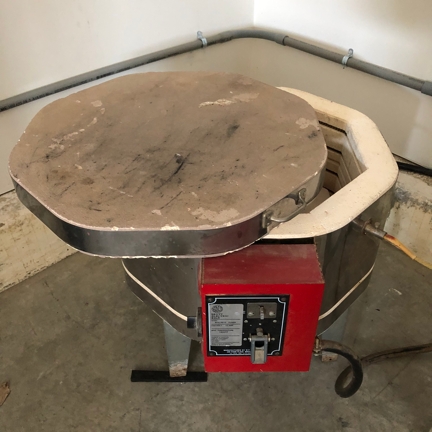
There are plenty of older ceramic kilns gathering dust in basements and garages. Just browse Craigslist and you'll see. To answer a common question, YES, your ceramic kiln will fuse glass.
However, these older kilns may not be equipped with an electronic controller. The controller contains the circuitry that executes a firing schedule while you're elsewhere getting other things done. They didn't become readily available until the nineties and, along with factory-tested glass, are the innovations that made fusing accessible to home crafters. Without a controller, a firing schedule must be executed manually, which is perfectly possible, but much less convenient.
You can buy a controller separately and add it to a used kiln. Expect to pay $400 - $1000 depending on its characteristics. Start with the manufacturer of your kiln. They will be in the best position to advise you on choices and installation. Alternatively, kiln distributors offer a variety of controllers and have the expertise to help. Here are a couple of resources:
If adding a controller is not in the cards, fret not. This article will guide you through the process of successful fusing without one.
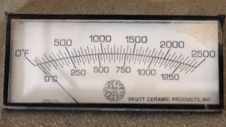
Ceramic artists sometimes measure heat using the cone system so older kilns may not have a temperature gauge. If your kiln does not display degrees Fahrenheit (or celcius), you will need to add a pyrometer. This is not a highly complex process and can be done without expert help. Shop the manufacturer of your kiln and/or kiln distributors.
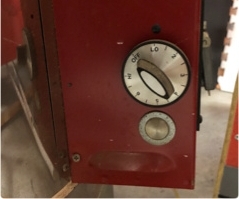
Your kiln probably has an “infinity switch,” a knob which has simple settings like “LO” “MED” “HI” “OFF.” If there is only an ON-OFF switch, add an infinity switch. Like the pyrometer, this is not terribly expensive or complicated to install.
Assuming you now have a kiln with a functioning temperature gauge and an infinity switch, let’s fuse some glass.
First, prepare yourself with a solid understanding of glass firing and firing schedules by absorbing these articles:
Ok, now you’re an expert. This knowledge will be your most important asset.
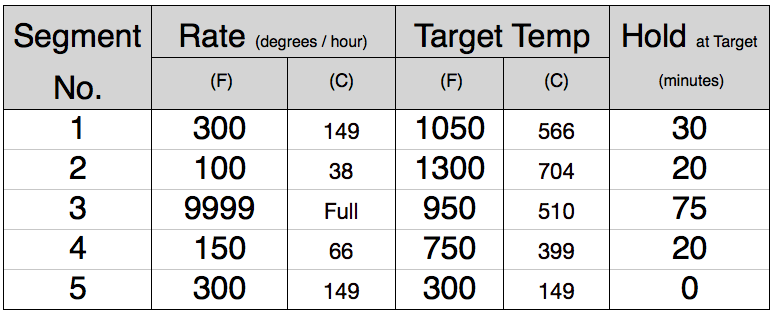
We’ll use this firing schedule as our example (Figure 1). It’s the same one used in the Controller article referenced above.
Look at the first segment — 300 degrees per hour (dph) to 1050F and then hold for 30 minutes. Your goal is to mimic that manually. The math: 1050 degrees / 300 dph = 3.5 hours, so you want to take the kiln from room temperature to 1050F over a 3.5 hour period, at a reasonably uniform rate of rise.
A rate of 300 dph would be an increase of 75 degrees every 15 minutes (300 / 60 = 5 degrees per minute. 5 x 15 = 75)
Record the starting temperature (probably room temperature). For simplicity, let's say that’s 100. Turn the switch to, say, halfway between LO & MED and check it again in 15 minutes. How much has it risen? In a perfect world it would be at 175. If it’s less than that, you're heating slower than 5 degrees per minute, and can turn the heat up a bit. If it’s significantly more than 175, you're heating faster than the schedule suggests and should lower the heat some.
Make your adjustments and check the temperature again at the half-hour mark. Perfection would be a reading of 250 degrees. Continue checking and adjusting. It won't take too long for you to find that sweet spot on the dial that will heat at about 75 degrees every fifteen minutes, or 300 dph. Make a note for future reference!
After three hours, your temperature should read about 1050F. At this point, our firing schedule instructs us to HOLD there for 30 minutes. To do so, adjust the heat down somewhat and check the temperature frequently, seeking to maintain the 1050 temperature for half an hour.
As you can see, the process is largely a matter of getting to know your kiln’s heating and cooling characteristics, and keeping good records. Before long you’ll be able to mimic firing schedule segments without checking every 15 minutes. But you’ll still need to pay close attention and make temperature adjustments throughout the process. It’s burdensome, but gets easier with experience because you can better predict the rate of temperature rise and fall. This is called “kiln-sitting” and you will become very familiar with it.
When you encounter a 9999 in the schedule, you can go to LO or OFF (if you are cooling) or HI (if you are heating) until the temperature approaches it’s target. Readjust early to avoid substantially overshooting.
Because you understand the two articles referenced above, you will know where in the firing schedule you can afford to be less precise without concern. For most segments, you will just calculate how much time it should take to reach the next temperature target, and then casually seek to accomplish that with a fairly uniform rate of change.
It’s not as hard as it sounds. It just takes paying attention and running back & forth to check the kiln and make adjustments. Recognize that, mathematically, the firing schedule above requires nearly eleven hours to execute as written.
Now get out there and earn enough money to buy a controller.